Learn to wrap your ear weights for comfort and safety
For several years now I have been wrapping the wearable surface of my metal ear weights in natural thread. I do this because my ears do not care for metals like brass, and because I find that after the thread softens from some wear, they become much more comfortable than bare metal alone.
My favorite antique brass weights are a pair of Iban Dayak 'spinning tops' or what are commonly referred to as 'pear weights'. They are over 100 years old, extremely heavy, and I love the patina but I do not want my ears touching the metal. Here they are below with a cotton thread wrap that has seen its way around the world a few times during my travels. Obviously, you will need to rewrap them periodically because the moisture from your lobes will eventually cause them to discolor and the metal patina will start to creep through.
I am a nerd for processes, and although many people consider it to be wasting time, I really enjoy spending time doing repetitive tasks and really paying attention to them. Over the years I have tried a few different methods of wrapping, some messier than others, and I've settled on what I believe to be a method that is pretty easy once you get the hang of it. It tidies up nice, too. It's shown below in several simple steps.
We'll start with a fresh pair of reproduction weights of the same style as above and some nice soft bamboo fiber string. Start by creating a loop that points in the direction you'll be wrapping from. Because the opening of these weights faces to the right in this photo, that is the direction the loop is pointed. Leave a small amount of string from one end of the loop hanging toward the rear.
This next step is the most difficult, especially if you have fat fingers like me. Pinch down at the very end of your loop and start wrapping string around the wearing surface, covering the loop. The difficulty lies in wrapping the area right where you are pinching. It is imperative that you make sure that these first wraps are snug (but not tight) and that your wrapping doesn't come loose from this end. You'll see at the end why if this is too tight, the entire process will have been in vain and the last steps will not work.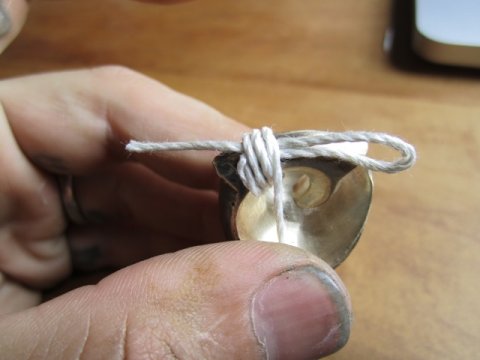
Continue wrapping snugly (but not tightly) until you reach the length of wrapped area you require. These weights have a small hole so I only wrapped one layer (make sure you don't fill up the area where your lobe is supposed to rest inside the body of the weight) but you could use thinner string and do multiple layers. Just make sure the end of your string ends up back on the loop end for the next step.
Insert the end of your string through the loop as shown. You'll notice my loop has twisted in this photo - make sure yours is still flat and not twisted. The twist will make the next step harder.
Gently but firmly pull the opposite loose end of your string to tighten your loop. The loop will first shrink and then start to draw the other end of your string under your wraps. At this point, if you have wrapped to tightly, your string may break or it may just get stuck. At the right tightness, you will feel some resistance but should not have to pull too hard to make this happen.
Trim and tuck in your rear string and then your front string. I use the end of a blunt pocket knife for this. You want something that will slide underneath your wraps but that will not damage the string.
Your completed wrap should look like this. The entire wrap should be just loose enough that you can arrange the individual threads with a fingernail and tidy them up.
Your weights now have a bit of individuality to them, and will be more comfortable and healthier for wear. Enjoy!